Wednesday, 30 January 2013

Web deployment task failed An error occurred when the request was processed on the remote computer.


Yesterday I have been trying to publish latest updates onto server and found error, when using web deploy method of publishing new release.

I have pressed next and I get following error.


Web deployment task failed. ((30/01/2013 19:43:59) An error occurred when the request was processed on the remote computer.)


Steps I took to find the error.
Log in onto your web server and open event log.
Find logs that are for source Web Deploy

You should find something as:

With detail


Please note the red underlined lines that describe issue.
Now note the account that web  deploy is using to update data on your server. It is the one in blue rectange.

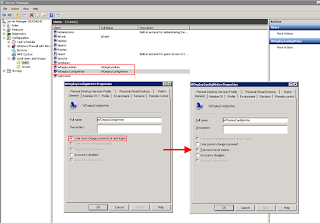
Ok, we have identified that the user account has expired.

Go to server manager and update account to remove account has expired and set account to never expire.


 Try deployment again, and publish has succeded.

Thursday, 17 January 2013

VS2012 - Expose internal to test class

Lets have project for which we want to do testing of all items. We know that access public methods is easy but private or internal its bit more difficult..

Project class:


namespace ClassLibrary1
{
    public class Project
    {
        /// <summary>
        /// Everyone can access
        /// </summary>
        public void Test01()
        {
        }

        /// <summary>
        /// Cannot be easily tested without assembly
        /// </summary>
        internal void Test02()
        {
        }

        /// <summary>
        /// Do not expose if not required. Will not be accessed from test, we use instead testing accessor using Test03Testing.
        /// </summary>
        private void Test03()
        {            
        }

        /// <summary>
        /// Create accessor for testing as internal.
        /// </summary>
        internal void Test03Testing()
        {
            Test03();
        }
    }
}


Test class

Now we create new test project and we want to create test for this implementation.


using ClassLibrary1;
using Microsoft.VisualStudio.TestTools.UnitTesting;

namespace UnitTestProject1
{
    [TestClass]
    public class UnitTest1
    {
        [TestMethod]
        public void Test01()
        {
            var project = new Project();
            project.Test01();
        }

        [TestMethod]
        public void Test02()
        {
            var project = new Project();
            project.Test02();
        }

       [TestMethod]
        public void Test03()
        {
            var project = new Project();
            project.Test03Testing();
        }
    }
}


However the compilation will end with messages and you will not get intellisense when typing the internal methods.


Now we will add "magic" line to AssemblyInfo.cs of the project that we want to test.

Default project looks like this:


Inside of the file add line:

// Expose internal methods to test class
[assembly: System.Runtime.CompilerServices.InternalsVisibleTo("Project.Tests")]

This will expose all internal items to test project.

If your rebuild the project again and all is working.


See test application here:
http://dl.dropbox.com/u/84298264/CodeExamples/TestingApplication.zip

With thanks to Bryan Avery for finding out the solution :)

Website Security - SQL injection


Couple rules to use:
  1. Always check your input parameters from user / system.
  2. If you getting string from input, never insert this input straight into SQL command


SQL injection examples:


"SELECT * FROM products
WHERE id LIKE '%a%'
exec master..xp_cmdshell 'net user test testpass /ADD' --%'"
;

You can comment out existing SQL and introduce your own sql to be executed.
 

Friday, 4 January 2013

Typescript objects


Required:
You need to have installed Typescript or have a way to test it.

You can try it here: http://www.typescriptlang.org/Playground/

// Interface that will be implemnted
interface IPerson {
    //definition of  variables
    FullName: string;
    GetName: string;
    // definition of a function
    GetFullName(): string;
}

interface IDeveloper {
    GetRole(): string;
}

//definition of class that Implements person
class Person implements IPerson {
    FullName: string;
    GetName: string;
    // constructor
    constructor(public name: string) {
        this.FullName = name;
    }
 
    // implemnetation of methods
    GetFullName() {
        return this.FullName;
    }
}
 
 
class Developer extends Person  implements IDeveloper{
    GetRole() {
        return "Developer";
    }
}
 
//example
 
var dev = new Developer("MyName");
alert(dev.GetFullName() + dev.GetRole()) 
 
//example will fail  
var dev = new Developer(1);
alert(dev.GetFullName() + dev.GetRole())


rendered code by typescript


var __extends = this.__extends || function (d, b) {
    function __() { this.constructor = d; }
    __.prototype = b.prototype;
    d.prototype = new __();
};
var Person = (function () {
    function Person(name) {
        this.name = name;
        this.FullName = name;
    }
    Person.prototype.GetFullName = function () {
        return this.FullName;
    };
    return Person;
})();
var Developer = (function (_super) {
    __extends(Developer, _super);
    function Developer() {
        _super.apply(this, arguments);

    }
    Developer.prototype.GetRole = function () {
        return "Developer";
    };
    return Developer;
})(Person);
var dev = new Developer("MyName");
alert(dev.GetFullName() + dev.GetRole());


Returning specific type:

In function I want to have specific return type. I have found this implementation:

function FunctionName(parameter1: string, callback: (result: string) => any){...}
which is specific return type for method that has multiple returns, and we can specify each type that can be returned.

for our example the return objects are:

1, string
2, any object

Thursday, 3 January 2013

Ajax Uploader web.config references

Ajax uploader:


Definitions for web.config

Source is from: http://ajaxuploader.com/document/index.htm#page=BeforeYouBegin.htm

As with many asp.net applications, AJAX Uploader makes use of the appSettings node in web.config file to store custom configuration settings that apply site wide. AppSettings is a predefined configuration section provided by the .NET framework.
The following is the list of available appSettings.
KeyDescription
CuteWebUI.AjaxUploader.TempDirectory
Sets a temporary file location used for file uploading. Unlike standard ASP.NET HtmlInputFile control, AJAX Uploader does not read the entire uploaded file into memory. It streams the data into a temporary file while the data is received. For this reason, you must specify a temporary file location.
Example:
<add key="CuteWebUI.AjaxUploader.TempDirectory" value="~/UploaderTemp" />
AjaxUploaderLicense
Sets the path where you want to store the Uploader license file.
Example:
<add key="AjaxUploaderLicense" value="~/somefolder/AjaxUploader.lic" />
CuteWebUI.AjaxUploader.DefaultMaxSizeKB
Sets the limit for the size of uploaded file, in kilobytes. This limit can be used to prevent denial of service attacks that are caused, for example, by users uploading large files to the server.
Example:
<add key="CuteWebUI.AjaxUploader.DefaultMaxSizeKB" value="1024" />
CuteWebUI.AjaxUploader.GlobalMaxSizeKB
Sets the limit for the size of uploaded file, in kilobytes. This limit can be used to prevent denial of service attacks that are caused, for example, by users uploading large files to the server.
Example:
<add key="CuteWebUI.AjaxUploader.GlobalMaxSizeKB" value="1024" />
CuteWebUI.AjaxUploader.UploadSpeedKB
Specifies the maximum transfer rate in KB/s (kilobytes per second). By default, the uploader takes the maximum speed. You can set a low upload speed to test the uploader progress bar.
Example:
<add key="CuteWebUI.AjaxUploader.UploadSpeedKB" value="20" />
CuteWebUI.AjaxUploader.DefaultExtensions
Gets or sets the allowed file extensions for uploading. Default is empty string, indicating all file extensions. The input string should be a comma-separated list of allowed extensions.
Example:
<add key="CuteWebUI.AjaxUploader.DefaultExtensions" value="zip,rar,txt,doc,jpg,gif,mp3" />
CuteWebUI.AjaxUploader.RewritePath
Specifies how you rewrite paths in applications. You may assigns an internal rewrite path so the rewriting information should be passed to uploader. THe input string could be "PathAndQuery", "RawUrl", "False", "IIS7".
Example:
<add key="CuteWebUI.AjaxUploader.RewritePath" value="PathAndQuery" />
CuteWebUI.AjaxUploader.BeginRequest
Specifies whether to intercept the BeginRequest.
Example:
<add key="CuteWebUI.AjaxUploader.BeginRequest" value="Delay" />
CuteWebUI.AjaxUploader.AllowSession
Specifies whether to allow sessions.
Example:
<add key="CuteWebUI.AjaxUploader.AllowSession" value="true" />
CuteWebUI.AjaxUploader.UseAspNetStream
Sets this attribute to true when IFrame mode is not able to display correct progress information or ASP.NET is not able to stream the data into temp file.
Example:
<add key="CuteWebUI.AjaxUploader.UseAspNetStream" value="true" />
CuteWebUI.AjaxUploader.HideDirectory
Sets this attribute to true if you don't want to display directory information in error messages.
Example:
<add key="CuteWebUI.AjaxUploader.HideDirectory" value="true" />
CuteWebUI.AjaxUploader.ShowStackTrace
Sets this attribute to true if you want to display Stack Trace in error messages.
Example:
<add key="CuteWebUI.AjaxUploader.ShowStackTrace" value="true" />
CuteWebUI.AjaxUploader.FlashUploadPage
Sets a special page for Flash - Integrated Windows Authentication.
Example:
<add key="CuteWebUI.AjaxUploader.FlashUploadPage" value="http://mytempsite.com/Upload/AnyName.aspx" />
CuteWebUI.AjaxUploader.Provider
Specifies a custom provider.
Example:
<add key="CuteWebUI.AjaxUploader.Provider" value="UploaderDatabaseProvider.UploaderSqlServerProvider,UploaderDatabaseProvider" />
CuteWebUI.AjaxUploader.WindowsDomain
When uploading a file using this virtual folder pointing to UNC share, Impersonation need to be used due to Asp_wp account does not have access to the network resources by default. To impersonate a specific Windows user, you need to specify three required parameters: a domain name, username and password.
Example:
<add key="CuteWebUI.AjaxUploader.WindowsDomain" value="mydomain" />
CuteWebUI.AjaxUploader.WindowsUsername
When uploading a file using this virtual folder pointing to UNC share, Impersonation need to be used due to Asp_wp account does not have access to the network resources by default. To impersonate a specific Windows user, you need to specify three required parameters: a domain name, username and password.
Example:
<add key="CuteWebUI.AjaxUploader.WindowsUsername" value="myusername" />
CuteWebUI.AjaxUploader.WindowsPassword
When uploading a file using this virtual folder pointing to UNC share, Impersonation need to be used due to Asp_wp account does not have access to the network resources by default. To impersonate a specific Windows user, you need to specify three required parameters: a domain name, username and password.
Example:
<add key="CuteWebUI.AjaxUploader.WindowsPassword" value="mypassword" />