Friday, 28 December 2012

TypeScript and MSBuild example

This article expects you to have basic knowledge aboutMS BUILD and have installed typescript on your machine.

I have started to use TypeScript. Now when the page is compiled I need to compile those TS files into JavaScript.

As default TypeScript does not compile, we need to add out compilation in order for us to get JavaScript files


Definition of my example BuildTypeScript.msbuild


<?xml version="1.0" encoding="utf-8"?>
<Project xmlns="http://schemas.microsoft.com/developer/msbuild/2003" DefaultTargets="BuildTypeScript" ToolsVersion="4.0" >

  <PropertyGroup>
  <sourcedir>D:\WebPortal</sourcedir>  
  <TypeScriptVersion>0.8.1.1</TypeScriptVersion>
  </PropertyGroup>  

 <ItemGroup> 
  <TypeScriptCompile Include="$(sourcedir)\**\*.ts" />
 </ItemGroup> 

  <Target Name="BuildTypeScript" Inputs="@(TypeScriptCompile)" Outputs="%(Identity).Dummy">
  <Message Text="@(TypeScriptCompile)" />  
<Exec Command="&quot;$(MSBuildProgramFiles32)\Microsoft SDKs\TypeScript\$(TypeScriptVersion)\tsc&quot; -target ES5 &quot;@(TypeScriptCompile)&quot;" />
  </Target>
</Project>


Check against your version:


  • I have added default value where is source of my project that you might need to update.
  • You need to check what version of type script has been installed on your local pc/build server

Command to execute:

msbuild BuildTypeScript.msbuild


Reference:
http://daysincode.blogspot.com/2012/12/msbuild-target-batching-for-each.html


TypeScript basics

Playground

Nice playground if you want to try anything without installing typescript on you PC.
http://www.typescriptlang.org/Playground/

Definition files

I have found definition source that is updated on regular bases: https://github.com/borisyankov/DefinitelyTyped

Declaring variables

Example of declaring jQuery without definition file:

declare var $: any;
declare var $;

What it does?
This will tell TypeScript that definition $ is defined and is of any type. Both statements are valid.


Using variables that already exists

Lets have script that is defined in one js file.
Script contains only definition variables.

var settings = {"defaultUserName""Unkown","timeout": 1200}
Now lets take the definition and use it in our ts file.

// declare variable that already exists. Leave this on top of the page
declare var settings;

What it does?
This will tell TypeScript that the variable has been already defined and is OK to use it.


Introducing TypeScript to existing project

What is TypeScript

You can read about it here: http://www.typescriptlang.org
In this article I will be focusing on how to run typescript as part of my existing solution (MVC3).
I am not going to use Nuget packages etc.

Installation

I should say that I am using Visual Studio 2012 Ultimate edition, but I have not found any options that will be related to Ultimate edition only.

I have downloaded add in for VS 2012 from http://www.typescriptlang.org/#Download

Also it is recommended that you install Web Essentials 2012

After installing both products you can run your type script files.


And here I am adding additional basic compile command.

I have found that I can generate definition files based on existing typescript file from


 tsc --declaration file.ts

How ever this does not work on js file that has been renamed into typescript.

Gotchas

  1. If your ts file does not parse(has lines under anything) it will also not compile and not work

Basic Guide TypeScript

Thursday, 27 December 2012

Finding and Installing FxCop

Finding and Installing FxCop


Searching for FxCop on Microsoft download site get me readme.txt  file only.

FxCop Installation Instructions
1. Download the Microsoft Windows SDK for Windows 7 and .NET Framework 4 version 7.1.
2. Run %ProgramFiles%\Microsoft SDKs\Windows\v7.1\Bin\FXCop\FxCopSetup.exe to install FxCop.

So after search for the install file:
I have found link http://www.microsoft.com/en-gb/download/details.aspx?id=8279
And run the setup file, I have redundant 200 MB that I do not need, and still I am not sure that I got all the files. I can uninstall everything when done.


After installation the file I am are looking for is located in :
%ProgramFiles%\Microsoft SDKs\Windows\v7.1\Bin\FXCop folder\

Alternative option is extraction from ISO disk here and download link for Microsoft Windows SDK for Windows 7 and .NET Framework 4 (ISO) here


Now we have installed FxCop.

You can run it on your system from your installation location.
 (default on my system is :"C:\Program Files (x86)\Microsoft Fxcop 10.0\FxCop.exe")


Lets try to use it in our VS 2012 solution.

I have created throw-away project where I have setup the project.
To switch FxCop on you need to do just simple steps.

  1. Open your project
  2. Right button on project and select properties
  3. Select Code Analysis
  4. Check checkbox nexto:  Enable Code Analysis on Build

This sets code analysis on build.
I have created my own rule set to have one specific for my projects.

Update Project file

I wanted to set custom conditions to my project. For this I had to update my project file, where is my code analysis running.

See comment in green highlighted code below.

<?xml version="1.0" encoding="utf-8"?>
<Project ToolsVersion="4.0" DefaultTargets="Build" xmlns="http://schemas.microsoft.com/developer/msbuild/2003">
  <Import Project="$(MSBuildExtensionsPath)\$(MSBuildToolsVersion)\Microsoft.Common.props" Condition="Exists('$(MSBuildExtensionsPath)\$(MSBuildToolsVersion)\Microsoft.Common.props')" />
  <PropertyGroup>
    <Configuration Condition=" '$(Configuration)' == '' ">Debug</Configuration>
      <!-- Insert your XML code in here-->


Set code analysis to run every time I build my project


<RunCodeAnalysis>Always</RunCodeAnalysis>


I do not want to run code analysis on generated code 

(this can be done in properties of project using properties of project)
<CodeAnalysisIgnoreGeneratedCode>true</CodeAnalysisIgnoreGeneratedCode>

I want the build to fail if project has missing rules
Indicates if the code analysis should fail if rule set is missing

<CodeAnalysisFailOnMissingRules>true</CodeAnalysisFailOnMissingRules>

Treat warnings as errors

This will not display any warnings in error list
<CodeAnalysisTreatWarningsAsErrors>false</CodeAnalysisTreatWarningsAsErrors>
This will get one error in Error List tab
<CodeAnalysisTreatWarningsAsErrors>true</CodeAnalysisTreatWarningsAsErrors>

And result in your error list will be:

and error list will be


Another additional information about FxCop and MS Build
http://www.paraesthesia.com/archive/2010/03/29/updating-your-continuous-integration-build-to-run-fxcop-from-vs2010.aspx

Friday, 21 December 2012

Web Deploy Wallk through

I wanted to setup my own web deploy setup for two reasons.
  1. I want to know how is this done
  2. I want to use my TFS build service to deploy the site so I do not need to spent so much time deploying every time I do upgrade on server.
  3. I want to use IIS credential instead common windows.

As start I have installed Web Deploy  service on my  hosting server.
So I have followed tutorial :


Requirements:

The server must have an operating system that comes with IIS7— this means either Windows Server 2008 or Windows Server 2008 R2.

Use WebPI to install Web Deploy along with its dependencies like the Web Management Service (WMSvc)

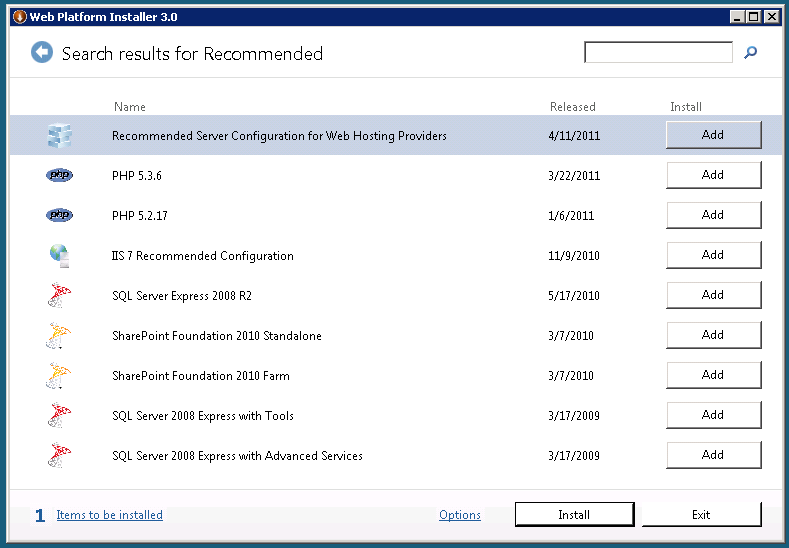
  1. Set up your machine like a hosting server using the "Recommended Configuration for Hosting Providers" product
    1. Download the Web Platform Installer
    2. Click in the search bar in the upper-right hand corner and search for "Recommended"
    3. Add the "Recommended Server Configuration for Web Hosting Providers" product and click Install
      • Note that this bundle includes some optional components, such as PHP and MySQL, which you can choose not to install with this bundle by clicking the "X" next to them on the next screen.
  2. Install Web Deploy by using either method 1 or 2 below:
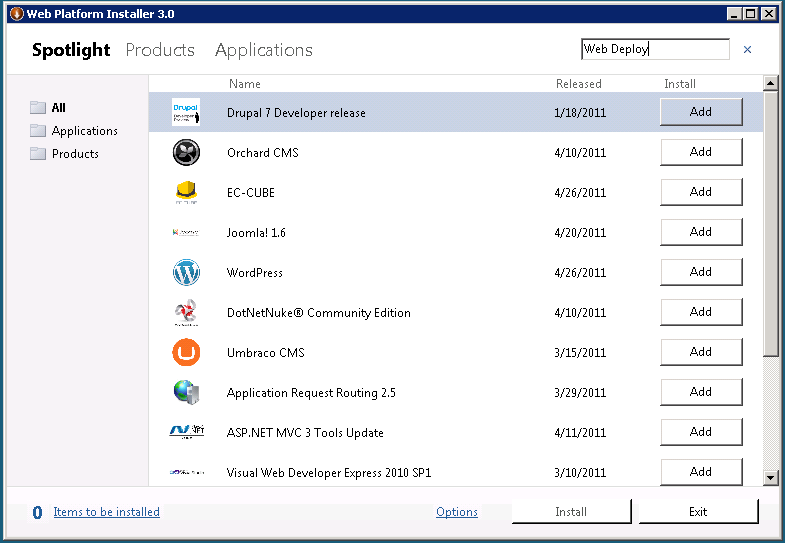
    1. Install Web Deploy and dependent products using the Web Platform Installer
      1. Download the Web Platform Installer. http://www.microsoft.com/web/downloads/platform.aspx
      2. In the upper-right hand corner, click in the search box, type "Web Deploy", and press ENTER

      3. Add the "Web Deployment Tool 2.1 for Hosting Servers" product and click Install.
    2. Download the Web Deploy installer directly from the IIS.net Web Deploy page http://www.iis.net/download/webdeploy ( x86 | x64 )
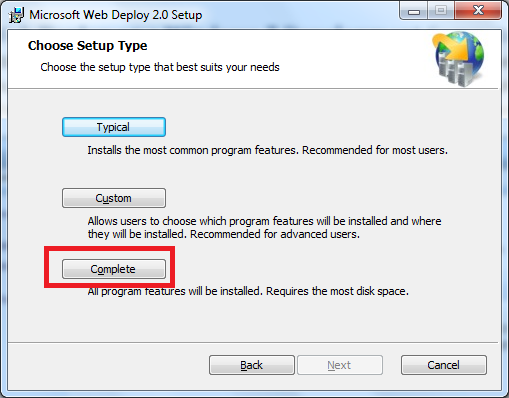
      1. In the Setup wizard choose the “Complete” setup option.
      2. Note: Using the MSI directly is generally not recommended for the novice user, as recommended or required dependent products must then be installed separately. The following limitations may create issues when using the MSI instead of WebPI to install Web Deploy on servers:
        1. The MSI will not install SQL Shared Management Objects (SMO), which is required for the SQL Server database deployments. This component may be installed using WebPI to enable SQL Server database deployments.
        2. The MSI will not install the Web Management Service handler component if the Web Management Service is not installed; the handler component is necessary for non-administrator deployments. Windows component IIS, including Management Service, should be installed first to enable the handler component to install.
        3. The MSI will not configure Web Management Service to allow non-administrator deployments if PowerShell v2 is not installed. This setup step includes creating delegation rules in the IIS server Administration.config file that allow non-administrator users to use Web Deploy. PowerShell v2 is built-in on Windows Server 2008 R2 but may require a Windows Update for Windows Server 2008. Alternatively the delegation rules may be added manually after install.

Configure a Site for Delegated Non-Administrator Deployment

After installing Web Deploy using method (1) or (2a), described above, all server-level configuration is complete for non-administrator publishing, however additional configuration is required at a site level. This site configuration can be accomplished using methods (1) or (2) described below.
  1. Create a new site or set permissions on an existing Web site for a new or existing non-administrator user using Web Deploy PowerShell scripts as explained in the PowerShell scripts walkthrough [link to be added] OR
  2. Configure publishing on an existing site for an existing user using the IIS Manager UI
    1. Start IIS Manager (type “inetmgr.exe” in the Start Menu)
    2. Expand the Sites node and right click a site, such as "test"
    3. Click Deploy > Configure for Web Deploy Publishing...
    4. The following UI will appear. Click ...
    5. Click Select :
      >
  1. Type the name of a non-administrator Windows user and click Ok
  2. When you click Setup, the following log will lines will appear:
  • Publish enabled for 'NonAdminUser'
  • Granted 'NonAdminUser' full control on 'C:\inetpub\wwwroot\test'
  • Successfully created settings file 'C:\Users\JohnDoe\Desktop\NonAdminUser_Default Web Site.PublishSettings'
  1. The non-administrator Windows user (NonAdminUser) may now publish to the site (test).


This is taken from Install webdeploy tutorial here.

Right, now I can go to my VS2012 and deploy.
I have updated my settings for web deploy. Setup service url.
The server has to be accessible on port 8172.
with address:  https://yourserver:8172/msdeploy.axd
Destination URL address that will be opened by the system,when deploy is successful.
you can see my definition below


Now we have setup the deploy configuration and can proceed to publish itself.


Click on publish button and the VS studio will publish to the location.

Issues that I have found


I have setup everything and when I hit publish, my studio came with error message:
Web deployment task failed. (Unable to perform the operation ("Create Directory")  for the specified directory ("Areas"). This can occur if the server administrator has not authorized this operation for the user credentials you are using.
  Learn more at: http://go.microsoft.com/fwlink/?LinkId=221672#ERROR_INSUFFICIENT_ACCESS_TO_SITE_FOLDER.)  


    ERROR_INSUFFICIENT_ACCESS_TO_SITE_FOLDER
        Diagnosis - This error code can surface if connecting over the Web Management Service as a non-administrator:
            If connecting using IIS Manager credentials, the Web Management Service's identity (typically Local Service) needs Full Control permissions on the site's root folder to be able to create files and folders underneath.
            If connecting using Windows credentials, the Windows user needs Full Control over the site's root folder to be able to create files and folders underneath.
        Resolution - Grant the appropriate account Full Control on the site's root folder. Alternatively:
            Start IIS Manger and right click on the site in question
            Click Deploy > Configure for Web Deploy Publishing
            Select the appropriate username
            Click Setup

 Solution
 the directory that you are trying to deploy into has to be accessible by local service and have full permissions as it is the service that is doing the Create Update or Delete