I have wrote article how to build typescript using msbuild file.
Now I have wanted to run it as part of my project, so every time the project file is build, the msbuild gets executed.
Steps to achieve this:
1,Open your project file using editor (so you can see the xml definition)
2,Search for import of Microsoft.Common.targets tag
<Import Project="$(MSBuildBinPath)\Microsoft.Common.targets" />
3, If you have not found this reference in your project include it, it can be added after <Project *>
This will enable for you to have BeforeBuild and AfterBuild events.
<Target Name="AfterBuild">
<Message Text="After Build" Importance="high" />
</Target>
<Target Name="BeforeBuild">
<Message Text="Before Build" Importance="high" />
</Target>
Now we need to add our specific implementation of msbuild actions.
I have decided that I want to implement my build in before build event.
Now I needed to include condition, in case that I do not want to run this compile every time.
Put following xml under first PropertyGroup. This will introduce variables that we are using later on.
Note: make sure you have correct version of typescript installed
<PropertyGroup>
<TypeScriptVersion>0.8.1.1</TypeScriptVersion>
<CompileTypeScript>true</CompileTypeScript>
</PropertyGroup>
Now we are ready to introduce our implementation.
The following can be inserted in Project tag, its best to add it in the end of the file.
<Project ToolsVersion="4.0" DefaultTargets="Build" xmlns="http://schemas.microsoft.com/developer/msbuild/2003">
<!-- omitted code -->
<!-- Insert your implementation -->
</Project>
Following tag will get all files from project directory that ends with .ts
<ItemGroup>
<TypeScriptCompile Include="$(ProjectDir)\**\*.ts" />
</ItemGroup>
Update before build event to call our custom target
<Target Name="BeforeBuild">
<Message Text="Before Build" Importance="high" />
<CallTarget Targets="TypeScriptBuild"/>
</Target>
And our implementation of build for every TypeScript build for every single file.
<Target Name="TypeScriptBuild" Inputs="@(TypeScriptCompile)" Outputs="%
(Identity).Dummy" Condition="'$(CompileTypeScript)'=='true'" >
<Message Text="Building typescript file - @(TypeScriptCompile)" Importance="high" />
<Exec Command=""$(MSBuildProgramFiles32)\Microsoft SDKs\TypeScript\$(TypeScriptVersion)\tsc" -target ES5 "@(TypeScriptCompile)"" />
</Target>
And after this just reload the project file and build the project.
In output window in Show output from : Option Build you will be able to find:
Monday, 31 December 2012
Friday, 28 December 2012
MSBuild Target Batching (For Each)
This article is not mine, and is copied from differentpla.net. I really wanted to keep copy of the article for my records.
<?xml version="1.0" encoding="utf-8"?>
<Project xmlns="http://schemas.microsoft.com/developer/msbuild/2003" ToolsVersion="4.0" DefaultTargets="Default">
   <ItemGroup>
      <ProjectsToPublish Include="AdminConsole\AdminConsole.csproj" />
      <ProjectsToPublish Include="AdminService\AdminService.csproj" />
   </ItemGroup>

   <Target Name="Default">
      <CallTarget Targets="PublishProjectOutput" />
   </Target>

   <Target Name="PublishProjectOutput" Inputs="@(ProjectsToPublish)" Outputs="%(Identity).Dummy">
      <Message Text="@(ProjectsToPublish)" />
   </Target>
</Project>
We set up an item group containing the items that we'd like to process. Our "Default" target is just to demonstrate that we don't need to do anything clever with CallTarget.
In order to get MSBuild to run the PublishProjectOutput target for each item in the item group, the necessary magic is in the Inputs and Outputs stuff. The trick is that the value in Outputs is the item metadata of the value in Inputs. That is: %(Identity) is actually treated as if it was %(ProjectsToPublish.Identity). MSBuild batches where the metadata values match. Since Identity is unique, each batch will contain a single item, giving us the "for each" behaviour we're looking for.
In order to get MSBuild to run the target at all, we need to specify the output files that will be generated. If we were to specify just %(Identity), MSBuild would decide that the outputs were up-to-date and would skip the target. So we dirty up the output by adding a fake extension to the filename. What this is doesn't particularly matter. %(Identity).Quack would work just as well (as long as you don't habitually have files called Foo.csproj.Quack, of course).
TypeScript and MSBuild example
This article expects you to have basic knowledge aboutMS BUILD and have installed typescript on your machine.
I have started to use TypeScript. Now when the page is compiled I need to compile those TS files into JavaScript.
As default TypeScript does not compile, we need to add out compilation in order for us to get JavaScript files
Definition of my example BuildTypeScript.msbuild
<?xml version="1.0" encoding="utf-8"?>
<Project xmlns="http://schemas.microsoft.com/developer/msbuild/2003" DefaultTargets="BuildTypeScript" ToolsVersion="4.0" >
<PropertyGroup>
<sourcedir>D:\WebPortal</sourcedir>
<TypeScriptVersion>0.8.1.1</TypeScriptVersion>
</PropertyGroup>
<ItemGroup>
<TypeScriptCompile Include="$(sourcedir)\**\*.ts" />
</ItemGroup>
<Target Name="BuildTypeScript" Inputs="@(TypeScriptCompile)" Outputs="%(Identity).Dummy">
<Message Text="@(TypeScriptCompile)" />
<Exec Command=""$(MSBuildProgramFiles32)\Microsoft SDKs\TypeScript\$(TypeScriptVersion)\tsc" -target ES5 "@(TypeScriptCompile)"" />
</Target>
</Project>
Check against your version:
Command to execute:
msbuild BuildTypeScript.msbuild
Reference:
http://daysincode.blogspot.com/2012/12/msbuild-target-batching-for-each.html
I have started to use TypeScript. Now when the page is compiled I need to compile those TS files into JavaScript.
As default TypeScript does not compile, we need to add out compilation in order for us to get JavaScript files
Definition of my example BuildTypeScript.msbuild
<?xml version="1.0" encoding="utf-8"?>
<Project xmlns="http://schemas.microsoft.com/developer/msbuild/2003" DefaultTargets="BuildTypeScript" ToolsVersion="4.0" >
<PropertyGroup>
<sourcedir>D:\WebPortal</sourcedir>
<TypeScriptVersion>0.8.1.1</TypeScriptVersion>
</PropertyGroup>
<ItemGroup>
<TypeScriptCompile Include="$(sourcedir)\**\*.ts" />
</ItemGroup>
<Target Name="BuildTypeScript" Inputs="@(TypeScriptCompile)" Outputs="%(Identity).Dummy">
<Message Text="@(TypeScriptCompile)" />
<Exec Command=""$(MSBuildProgramFiles32)\Microsoft SDKs\TypeScript\$(TypeScriptVersion)\tsc" -target ES5 "@(TypeScriptCompile)"" />
</Target>
</Project>
Check against your version:
- I have added default value where is source of my project that you might need to update.
- You need to check what version of type script has been installed on your local pc/build server
Command to execute:
msbuild BuildTypeScript.msbuild
Reference:
http://daysincode.blogspot.com/2012/12/msbuild-target-batching-for-each.html
TypeScript basics
Playground
Nice playground if you want to try anything without installing typescript on you PC.http://www.typescriptlang.org/Playground/
Definition files
I have found definition source that is updated on regular bases: https://github.com/borisyankov/DefinitelyTypedDeclaring variables
Example of declaring jQuery without definition file:
declare var $: any;
declare var $;
What it does?This will tell TypeScript that definition $ is defined and is of any type. Both statements are valid.
Using variables that already exists
Lets have script that is defined in one js file.
Script contains only definition variables.
var settings = {"defaultUserName": "Unkown","timeout": 1200}
Now lets take the definition and use it in our ts file.
// declare variable that already exists. Leave this on top of the page
declare var settings;
What it does?
This will tell TypeScript that the variable has been already defined and is OK to use it.
Introducing TypeScript to existing project
What is TypeScript
You can read about it here: http://www.typescriptlang.org
In this article I will be focusing on how to run typescript as part of my existing solution (MVC3).
I am not going to use Nuget packages etc.
Installation
I should say that I am using Visual Studio 2012 Ultimate edition, but I have not found any options that will be related to Ultimate edition only.
I have downloaded add in for VS 2012 from http://www.typescriptlang.org/#Download
Also it is recommended that you install Web Essentials 2012
After installing both products you can run your type script files.
And here I am adding additional basic compile command.
I have found that I can generate definition files based on existing typescript file from
How ever this does not work on js file that has been renamed into typescript.
Gotchas
Basic Guide TypeScript
You can read about it here: http://www.typescriptlang.org
In this article I will be focusing on how to run typescript as part of my existing solution (MVC3).
I am not going to use Nuget packages etc.
Installation
I should say that I am using Visual Studio 2012 Ultimate edition, but I have not found any options that will be related to Ultimate edition only.
I have downloaded add in for VS 2012 from http://www.typescriptlang.org/#Download
Also it is recommended that you install Web Essentials 2012
After installing both products you can run your type script files.
And here I am adding additional basic compile command.
I have found that I can generate definition files based on existing typescript file from
tsc --declaration file.tsHow ever this does not work on js file that has been renamed into typescript.
Gotchas
- If your ts file does not parse(has lines under anything) it will also not compile and not work
Basic Guide TypeScript
Thursday, 27 December 2012
Finding and Installing FxCop
Finding and Installing FxCop
Searching for FxCop on Microsoft download site get me readme.txt file only.
FxCop Installation Instructions
1. Download the Microsoft Windows SDK for Windows 7 and .NET Framework 4 version 7.1.
2. Run %ProgramFiles%\Microsoft SDKs\Windows\v7.1\Bin\FXCop\FxCopSetup.exe to install FxCop.
So after search for the install file:
I have found link http://www.microsoft.com/en-gb/download/details.aspx?id=8279
And run the setup file, I have redundant 200 MB that I do not need, and still I am not sure that I got all the files. I can uninstall everything when done.
After installation the file I am are looking for is located in :
%ProgramFiles%\Microsoft SDKs\Windows\v7.1\Bin\FXCop folder\
Alternative option is extraction from ISO disk here and download link for Microsoft Windows SDK for Windows 7 and .NET Framework 4 (ISO) here
Now we have installed FxCop.
You can run it on your system from your installation location.
(default on my system is :"C:\Program Files (x86)\Microsoft Fxcop 10.0\FxCop.exe")
Lets try to use it in our VS 2012 solution.
I have created throw-away project where I have setup the project.To switch FxCop on you need to do just simple steps.
- Open your project
- Right button on project and select properties
- Select Code Analysis
- Check checkbox nexto: Enable Code Analysis on Build
This sets code analysis on build.
I have created my own rule set to have one specific for my projects.
Update Project file
I wanted to set custom conditions to my project. For this I had to update my project file, where is my code analysis running.
See comment in green highlighted code below.
<?xml version="1.0" encoding="utf-8"?> <Project ToolsVersion="4.0" DefaultTargets="Build" xmlns="http://schemas.microsoft.com/developer/msbuild/2003"> <Import Project="$(MSBuildExtensionsPath)\$(MSBuildToolsVersion)\Microsoft.Common.props" Condition="Exists('$(MSBuildExtensionsPath)\$(MSBuildToolsVersion)\Microsoft.Common.props')" /> <PropertyGroup> <Configuration Condition=" '$(Configuration)' == '' ">Debug</Configuration><!-- Insert your XML code in here-->
Set code analysis to run every time I build my project
<RunCodeAnalysis>Always</RunCodeAnalysis>
I do not want to run code analysis on generated code
(this can be done in properties of project using properties of project)
and error list will be<CodeAnalysisIgnoreGeneratedCode>true</CodeAnalysisIgnoreGeneratedCode>I want the build to fail if project has missing rulesIndicates if the code analysis should fail if rule set is missing<CodeAnalysisFailOnMissingRules>true</CodeAnalysisFailOnMissingRules>
Treat warnings as errors
This will not display any warnings in error list<CodeAnalysisTreatWarningsAsErrors>false</CodeAnalysisTreatWarningsAsErrors>This will get one error in Error List tab<CodeAnalysisTreatWarningsAsErrors>true</CodeAnalysisTreatWarningsAsErrors>And result in your error list will be:
Another additional information about FxCop and MS Build
http://www.paraesthesia.com/archive/2010/03/29/updating-your-continuous-integration-build-to-run-fxcop-from-vs2010.aspx
Friday, 21 December 2012
Web Deploy Wallk through
I wanted to setup my own web deploy setup for two reasons.
As start I have installed Web Deploy service on my hosting server.
So I have followed tutorial :
This is taken from Install webdeploy tutorial here.
Right, now I can go to my VS2012 and deploy.
I have updated my settings for web deploy. Setup service url.
The server has to be accessible on port 8172.
with address: https://yourserver:8172/msdeploy.axd
Destination URL address that will be opened by the system,when deploy is successful.
you can see my definition below
Solution
the directory that you are trying to deploy into has to be accessible by local service and have full permissions as it is the service that is doing the Create Update or Delete
- I want to know how is this done
- I want to use my TFS build service to deploy the site so I do not need to spent so much time deploying every time I do upgrade on server.
- I want to use IIS credential instead common windows.
As start I have installed Web Deploy service on my hosting server.
So I have followed tutorial :
Requirements:
The server must have an operating system that comes with IIS7— this means either Windows Server 2008 or Windows Server 2008 R2.Use WebPI to install Web Deploy along with its dependencies like the Web Management Service (WMSvc)
- Set up your machine like a hosting server using the "Recommended Configuration for Hosting Providers" product
- Download the Web Platform Installer
- Click in the search bar in the upper-right hand corner and search for "Recommended"
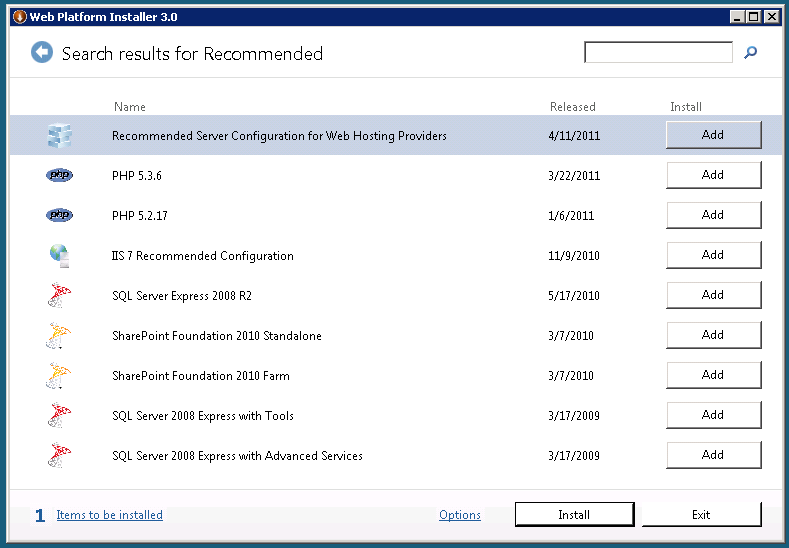
- Add the "Recommended Server Configuration for Web Hosting Providers" product and click Install
- Note that this bundle includes some optional components, such as PHP and MySQL, which you can choose not to install with this bundle by clicking the "X" next to them on the next screen.
- Install Web Deploy by using either method 1 or 2 below:
- Install Web Deploy and dependent products using the Web Platform Installer
- Download the Web Platform Installer. http://www.microsoft.com/web/downloads/platform.aspx
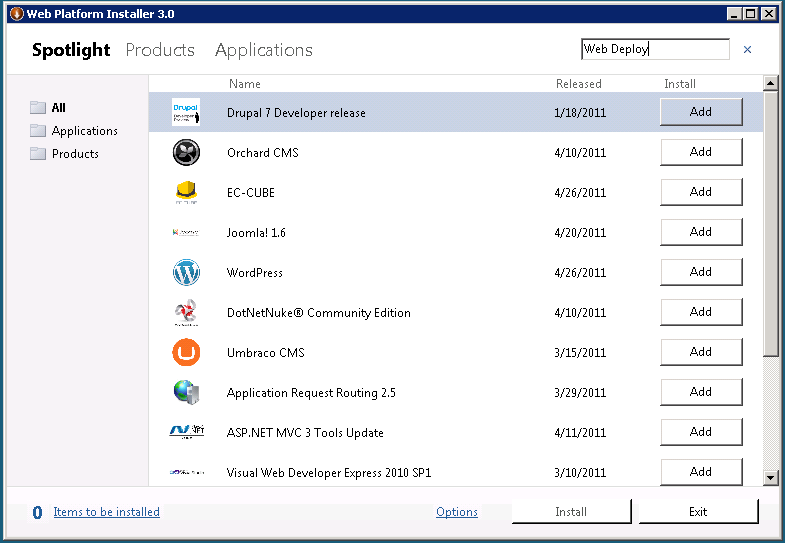
- In the upper-right hand corner, click in the search box, type "Web Deploy", and press ENTER
- Add the "Web Deployment Tool 2.1 for Hosting Servers" product and click Install.
- Download the Web Deploy installer directly from the IIS.net Web Deploy page http://www.iis.net/download/webdeploy ( x86 | x64 )
- Install Web Deploy and dependent products using the Web Platform Installer
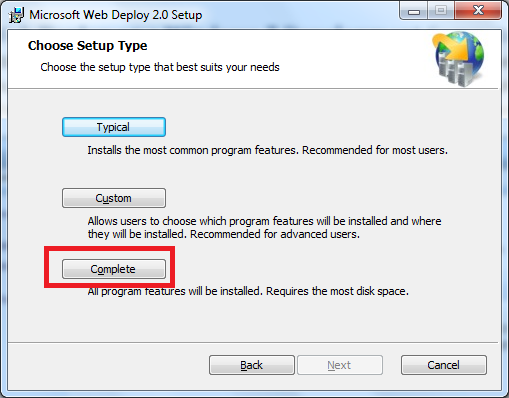
- In the Setup wizard choose the “Complete” setup option.
- Note: Using the MSI directly is generally not recommended for
the novice user, as recommended or required dependent products must then
be installed separately. The following limitations may create issues when using the MSI instead of WebPI to install Web Deploy on servers:
- The MSI will not install SQL Shared Management Objects (SMO), which is required for the SQL Server database deployments. This component may be installed using WebPI to enable SQL Server database deployments.
- The MSI will not install the Web Management Service handler component if the Web Management Service is not installed; the handler component is necessary for non-administrator deployments. Windows component IIS, including Management Service, should be installed first to enable the handler component to install.
- The MSI will not configure Web Management Service to allow non-administrator deployments if PowerShell v2 is not installed. This setup step includes creating delegation rules in the IIS server Administration.config file that allow non-administrator users to use Web Deploy. PowerShell v2 is built-in on Windows Server 2008 R2 but may require a Windows Update for Windows Server 2008. Alternatively the delegation rules may be added manually after install.
Configure a Site for Delegated Non-Administrator Deployment
After installing Web Deploy using method (1) or (2a), described above, all server-level configuration is complete for non-administrator publishing, however additional configuration is required at a site level. This site configuration can be accomplished using methods (1) or (2) described below.- Create a new site or set permissions on an existing Web site for a new or existing non-administrator user using Web Deploy PowerShell scripts as explained in the PowerShell scripts walkthrough [link to be added] OR
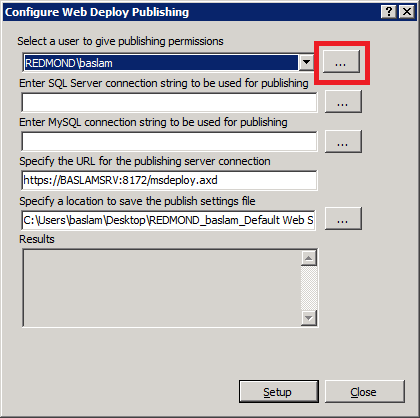
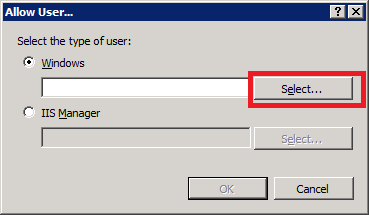
- Configure publishing on an existing site for an existing user using the IIS Manager UI
- Type the name of a non-administrator Windows user and click Ok
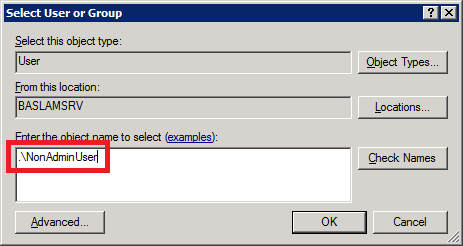
- When you click Setup, the following log will lines will appear:
- Publish enabled for 'NonAdminUser'
- Granted 'NonAdminUser' full control on 'C:\inetpub\wwwroot\test'
- Successfully created settings file 'C:\Users\JohnDoe\Desktop\NonAdminUser_Default Web Site.PublishSettings'
- The non-administrator Windows user (NonAdminUser) may now publish to the site (test).
This is taken from Install webdeploy tutorial here.
Right, now I can go to my VS2012 and deploy.
I have updated my settings for web deploy. Setup service url.
The server has to be accessible on port 8172.
with address: https://yourserver:8172/msdeploy.axd
Destination URL address that will be opened by the system,when deploy is successful.
you can see my definition below
Now we have setup the deploy configuration and can proceed to publish itself.
Click on publish button and the VS studio will publish to the location.
Issues that I have found
I have setup everything and when I hit publish, my studio came with error message:
Web deployment task failed. (Unable to perform the operation ("Create Directory") for the specified directory ("Areas"). This can occur if the server administrator has not authorized this operation for the user credentials you are using.
Learn more at: http://go.microsoft.com/fwlink/?LinkId=221672#ERROR_INSUFFICIENT_ACCESS_TO_SITE_FOLDER.)
ERROR_INSUFFICIENT_ACCESS_TO_SITE_FOLDER
Diagnosis - This error code can surface if connecting over the Web Management Service as a non-administrator:
If connecting using IIS Manager credentials, the Web Management Service's identity (typically Local Service) needs Full Control permissions on the site's root folder to be able to create files and folders underneath.
If connecting using Windows credentials, the Windows user needs Full Control over the site's root folder to be able to create files and folders underneath.
Resolution - Grant the appropriate account Full Control on the site's root folder. Alternatively:
Start IIS Manger and right click on the site in question
Click Deploy > Configure for Web Deploy Publishing
Select the appropriate username
Click Setup
Solution
the directory that you are trying to deploy into has to be accessible by local service and have full permissions as it is the service that is doing the Create Update or Delete
Web deploy: ERROR_DESTINATION_NOT_REACHABLE.
I wanted to use web deploy from my development PC and build server to the test environment and to production if needed. I have been getting really annoying message:
Web deployment task failed. (Could not connect to the remote computer ("192.168.110.211"). On the remote computer, make sure that Web Deploy is installed and that the required process ("Web Management Service") is started. Learn more at: http://go.microsoft.com/fwlink/?LinkId=221672#ERROR_DESTINATION_NOT_REACHABLE.)
Great, So what do I do now?
I have checked whether the web deploy is actually installed on my server and I have verified that it is.
As next step I have turned off my firewall and firewall on the server as the message says, not reachable right?. Test it again and no success.
As next step I have found following guide:
http://www.iis.net/learn/install/installing-publishing-technologies/installing-and-configuring-web-deploy
From where I have copied steps below:
I only needed to restart all services (first 3 steps) and preview and confirm is working.
Web deployment task failed. (Could not connect to the remote computer ("192.168.110.211"). On the remote computer, make sure that Web Deploy is installed and that the required process ("Web Management Service") is started. Learn more at: http://go.microsoft.com/fwlink/?LinkId=221672#ERROR_DESTINATION_NOT_REACHABLE.)
Great, So what do I do now?
I have checked whether the web deploy is actually installed on my server and I have verified that it is.
As next step I have turned off my firewall and firewall on the server as the message says, not reachable right?. Test it again and no success.
As next step I have found following guide:
http://www.iis.net/learn/install/installing-publishing-technologies/installing-and-configuring-web-deploy
From where I have copied steps below:
Trouble-shooting Common Issues:
- If you are upgrading an existing installation of Web Deploy, make sure to restart the handler and agent services by running the following commands at an administrative command prompt:
- net stop msdepsvc & net start msdepsvc
- net stop wmsvc & net start wmsvc
- Make sure your firewall allows connections to the service you are using. By default, the Web Deployment Agent Service (MsDepSvc) listens on port 80, and the Web Management Service (WmSvc, also called the "handler") listens on port 8172 by default.
- You must run MsDepSvc by using the built-in Administrator account, or from a domain account that has been added to the Administrators group. A local administrator which is not the built-in account will not work with MsDepSvc.
- Check to see if .NET 4.0 has not been registered with IIS:
Symptoms: .NET 4.0 is installed, but there are no .NET 4.0
application pools or handler mappings in IIS. You cannot browse to
applications that use .NET 4.0 (for example, applications based on
WebMatrix’s site template applications) after you publish them.
Cause: Your machine had .NET 4.0 installed on it before IIS was installed.
Solution: Run the following command to register .NET 4.0 with IIS: %systemdrive%\Windows\Microsoft.NET\Framework64\v4.0.30319\aspnet_regiis.exe -iru
I only needed to restart all services (first 3 steps) and preview and confirm is working.
Thursday, 20 December 2012
jQuery and Javascript
Here I am adding some memory nudges about javascript and jQuery.
Check for variable is defined
in JavaScript null is an object. There's another value for things that don't exist, undefined. The DOM returns null for almost all cases where it fails to find some structure in the document, but in JavaScript itself undefined is the value used.
Second, no, they are not directly equivalent. If you really want to check for null, do:
if (null == yourvar) // with casting
if (null === yourvar) // without casting
If you want to check if a variable exist
if (typeof yourvar != 'undefined') // Any scope
if (window['varname'] != undefined) // Global scope
if (window['varname'] != void 0) // Old browsers
If you know the variable exists but don't know if there's any value stored in it:
if (undefined != yourvar)
if (void 0 != yourvar) // for older browsers
If you want to know if a member exists independent of whether it has been assigned a value or not:
if ('membername' in object) // With inheritance
if (object.hasOwnProperty('membername')) // Without inheritance
If you want to to know whether a variable autocasts to true:
if(variablename)
I probably forgot some method as well...
Taken from: http://stackoverflow.com/questions/858181/how-to-check-a-not-defined-variable-in-javascript
Wednesday, 12 December 2012
Datepicker date format helper
I have been working on dates and multi language implementation.
I have wrote small class that helps with dates and jQuery.
using System.Globalization;

namespace HtmlHelpers
{
    public class DateTimeTimeHelper
    {
        /// <summary>
        /// Override jquery date time format with format from current thread.
        /// </summary>
        /// <returns>Javascript format to override jquery date picker settings.</returns>
        public static string OverrideFormat()
        {
            string str = "<script type=\"text/javascript\">";
            str += string.Format("$.datepicker.setDefaults({ dateFormat: '{0}' })", DateTimeTimeHelper.GetDateFormatPatternForCulture());
            str += "</script>";
            str += "</head>";
            return str;
        }

        /// <summary>
        /// Get date format pattern for UI culture.
        /// </summary>
        /// <returns>String pattern.</returns>
        public static string GetDateFormatPatternForCulture()
        {
            var dateFormat = GetJavascriptShortDatePattern(System.Threading.Thread.CurrentThread.CurrentUICulture.DateTimeFormat);

            return dateFormat;
        }

        /// <summary>
        /// Gets the javascript short date pattern.
        /// </summary>
        /// <param name="dateTimeFormat">The date time format.</param>
        /// <returns>Reformated short date string.</returns>
        public static string GetJavascriptShortDatePattern(DateTimeFormatInfo dateTimeFormat)
        {
            return dateTimeFormat.ShortDatePattern.Replace("M", "m").Replace("yy", "y");
        }

        /// <summary>
        /// Gets the javascript short date pattern.
        /// </summary>
        /// <param name="dateTimeFormat">The date time format.</param>
        /// <returns>Reformated short date string.</returns>
        public string GetJavascriptShortDatePattern(string dateTimeFormat)
        {
            return dateTimeFormat.Replace("M", "m").Replace("yy", "y");
        }
    }
}
Tuesday, 11 December 2012
OOP JS
Running example for me to learn
Running example http://jsfiddle.net/cpoDesign/Cze3X/6/
Creating OOP for js can be done as following.
var masterPage ={
confirmBoxMsg: 'Selection not available.',
settings:{
version:0.1,
gridSettings:{
width: 'auto',
height:'auto'
}
},
showAlert: function(){
alert('test');
},
showAlertWithAttr: function(variable){
alert(variable);
},
showAlertWithFromSettings: function(){
alert('Reading version:'+ this.settings.version);
},
dataAccess:function(url,arguments, complete, errorEvent){
$.ajax({
url:url,
type:'GET',
data:arguments,
success: complete,
error:errorEvent,
});
}
}
// calls logic in printing
//masterPage.showAlert();
// logic with wariable
//masterPage.showAlertWithAttr('variable value');
// logic to read variables from object
masterPage.showAlertWithFromSettings()
// using ajax call to do some work (not working yet)
//masterPage.dataAccess("http://www.google.co.uk/",function(res){
//alert('loaded' + res.responseText);},function(){alert('failed');});
Sunday, 9 December 2012
How to set up a split-tunnel VPN in Windows
I always after setting up new VPN connection have to remember to do this. I have saved all article that I have found.
By default, when you create a VPN connection, Windows funnels all of the communications from your computer through the VPN. So, if you're logged into a corporate VPN from home to check your email, all of the other Web surfing you're doing on your computer is also being run through your corporate network. This is the default behavior because, from the company's point of view, it's the safest way and ensures all traffic is protected regardless of the destination.
You might not want this behavior, however, for a couple of reasons. First, it allows your company to inspect all of your personal Web traffic while connected to the VPN. Second, it will likely slow down your access to the Web, as everything must first be sent through the VPN.
Split tunneling, on the other hand, configures the VPN connection so that only traffic headed to computers on the corporate network is sent through the VPN connection. Other traffic leaving your computer goes out through your normal network connection.
Follow these steps to set up a VPN connection in Windows Vista that uses split tunneling:
From that point forward, only traffic destined for your corporate network will be sent through the VPN. All other traffic will use the local network.
- From the Control Panel, choose "Network & Internet."
- Click "View Network Status and Tasks."
- Click "Manage Network Connections."
- Right-click on your VPN connection and select "Properties."
- Select the "Networking" tab.
- Highlight "Internet Protocol Version 4 (TCP/IP v4)."
- Click "Properties."
- Click "Advanced."
- Uncheck the "Use default gateway on remote network" box.
- Click "OK" three times to close the windows you opened.
Author and original answer
Subscribe to:
Posts (Atom)


